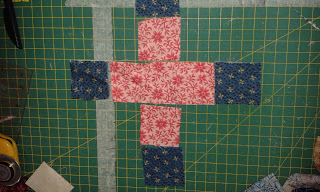
 |
| 4 squares 3 1/2"each |
 |
| 8 squares 2" |
Draw a line on the back of each of these squares from corner to corner.
Place the 2"squares on two opposite corners of the 3 1/2"squres, and sew along the drawn line.
Cut off the excess fabrics. You can discard, or keep these - you don't need them for this project.
press the corners out, with the seams flat.
Next"choose the fabric for the centre cross. Cut 2 squares 2"and one strip 5"x 2"
Find some good contrasting fabrics for the ends of the cross. Cut 4 squares 2"
I made my blocks in this order - the corner pieces, then added the little strips between 2 of them, then put the larger strip of the cross through the centre.
When I pressed the blocks, I made sure one of the centre pieces I press out, and the one where I joined the 3 sets, I pressed in. This is so that when I come to joining all the blocks together, I will be able to butt all the seams together. If they don't fit one way, then I just turn them, and they will fit the other way.
The finished size of my blocks are 7 1/2". If you use the pattern on Block Base, you can choose any size you want. However, you do get a template for the outer corners of the blocks, which might be a bit tricky for some people.
Colour choices.......for me, it was about getting a good contrast, and not really trying to match anything. People often comment to me that they can pick out my quilts, because of the colours/fabric mix I use. It is because I do not "over-think"it, and do not spend too much time choosing what does or does not go with something.
Hope you enjoy making these lovely little blocks as I have. Good luck with it!
What I forgot to write (as I had the internet cut in and out) is that if you want to use the Block Base pattern it is number 1970 and has a square in the centre, where mine just has the straight strip.


Thank you for these directions. I was thinking about making this, using directional fabric like you did. I found a pattern elsewhere, but it is nice to get it straight from the source!
ReplyDeleteThanks very much for posting the instructions!!
ReplyDeleteThank you so much Wendy! I'll be searching for stripes :)
ReplyDeleteSo appreciate you doing this. Your blocks were beautiful and inspiring!
ReplyDeleteWonderful tutorial, thank you. I just love these blocks, but it really is your fabric choices that make them sing.
ReplyDeleteThank you so much Wendy for the instructions to the scrappy cross block. You are so generous in your sharing of patterns. My "Wendy" binder is overflowing with your generosity.
ReplyDeleteTerry in So. Calif.
Thanks Wendy
ReplyDeleteIts a great block!
ReplyDeleteThis is a lovely scrappy block, thanx for the instructions! I've just purchased a few repro fabrics and was wondering what to do with them... this looks like my perfect solution!
ReplyDelete