Welcome! This is the blog of Wendy Whellum and Legend and Lace Designs

Welcome to the Blog of Wendy Whellum and Legend and Lace

To find out more about Legend and Lace please visit the website http://www.legendandlace.com/


Quilt Gallery

Monday, March 21, 2016

What have I been doing this week?

 I decided to finish my UFO "Hawaii Sunset".  Having decided not too many shortcut would do, I started to tackle the side half blocks.  I cut up and sewed the pinks and greens
 Adding the bright blue strips first
 then the dark blue strips
Finally, I got the 4 corner pieces done. These strips, squares and triangles are not the same size as those above, but they look like they are.

I had thought it would take me a day.....wrong!  Once cut, it took me about an hour to make them all,
Time to start the assembly, starting with the corners and working towards the centre.  This is where I came unstuck!
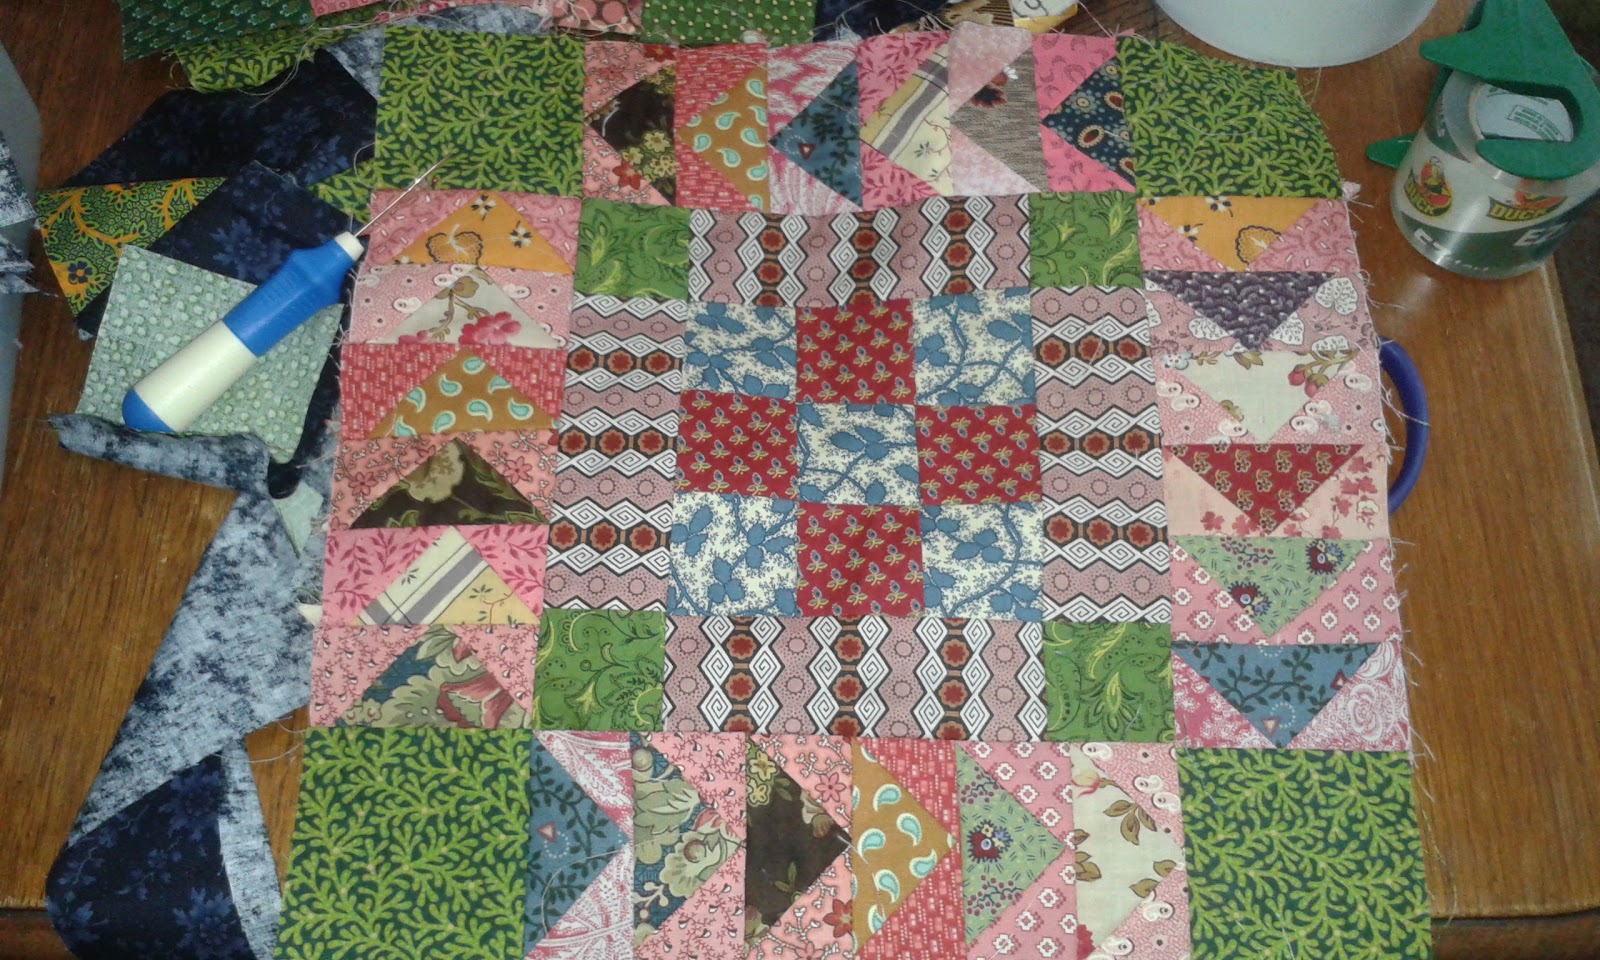
 These blocks are wrong.  The Flying Geese are flying in all sorts of directions

These FG are correct.  They start at the bottom, fly around the centre, upwards towards the top, where the points meet.  Almost half of my blocks were wrong!.


This may have been the reason they ended up in the "too hard"box 6 years ago.  Who does not hate unpicking?

Two hours back on this project, and I had the job of unpickin 2 FG strips on almost half of the blocks.  It took me half a day, but I did it.

Row number two added

Row number 3 added


Row number 4 added, and I am running out of space on my floor to take photos.


Finally, all the blocks are assembled, with the sashing.  Time to get those 4 patch blocks out and see what I can do with the borders.


I had to lay them down on the the passage floor to get a shot.  However, I did measure them against the quilt and, low and behold, they fit!  Even the the top and bottom borders fit......and that was pure luck.  I had turned this into a rectangle quilt rather than a square quilt, and had no idea if the top and bottom borders would be ok...half a 4 patch too short or too long?.....no .....they fit!  I had visions of having to slip in a skinny strip of fabric along the edges to make it all fit, but looks like it is not necessary.

This past week I have done very little else about the house, but it seems to be worth it to get this old beauty finished.

How am I going to quilt it?????  I am not skilled enough to machine quilt it myself, and hand quilting is my preference, but there are so many seams, I think it is going to be hard going.  Custom machine quilting I think might be the answer, and I will investigate the options there.  Any ideas?


Wednesday, March 16, 2016

One UFO that will get finished

When I was having de-clutter a few weeks ago, and I was looking for odd blocks to turn into "something",  I found a box of treasures.
I decided they were too good to go into the "odd block"quilt and put them back on the shelf "for another day (year?)".  This quilt was started in March 2010.  How do I know that?  I blogged about it HERE .

The blocks were completed in August of that year.  I have the photographic evidence! Right here

So what went wrong?  The darn edge pieces and the sashing!  It is fun making the blocks, then you have to make it into a quilt!

On the weekend I went to the hospital to visit my friend Sheila.  She has been in and out of hospital for the last month, and pretty well sick of the whole thing. She asked me to bring along some "show and tell".  I dug out the blocks I have been working on for the last few weeks.

Plus the quilt blocks I found while cleaning out.  There I was, supposing to cheer up a sick friend (and by all accounts it did), and she was the one who inspired me into getting this thing finished.

I counted up and had 18 blocks.  I can recall that I had decided not to do a square quilt, but a rectangular one instead.  Also, I recall thinking I would do a straight set and not a on-point set......but I had 18 bloocks, which is what I needed to do the on-point.  It was those tricky side half block pieces that must have made them all go into the "too hard box" and stay there for 6 years.

I also found that I had made heaps of the 4 patch border pieces.  I can't not do it!

After my visit to hospital, I got home and started cutting up the sashing (yes I had that too!) and the setting squares.  I had more or less decided to use a pretty print on the sides instead of the pieced units, but could not decide on the print.

So, it did worked.  the visit to hospital cheered me up no end!  (sorry Sheila)

Today I made the first of the side triangles.  And, they are not as bad as I thought.  I made one, and it took me 5 minutes to cut and 5 minutes to sew.  So, once I get them quick cut, and feed them through the sewing machine, I recon I will have them done in a day.


This is how they go with the blocks and sashing.  I am really going to give myself a target with this one, and see if I can get it done this year  -  hand quilted and all!

Thursday, March 3, 2016

By popular demand.....

I have had quite a few people ask me how to make this little Noughts and Crosses (my name for it) block.  So I will show you how it is done.

4 squares 3 1/2"each
Choose 4 different fabrics for the corners.  I used directional fabrics, and cut on the cross.  The squares measure 3 1/2".  I made myself up a little plastic template so it was easier to place along the line of the print.

8 squares 2"
 Next choose a fabric that will go with the above fabric as a contrast.  I cut up lots of 2"strips in various colour values, and just chose from that.  You will need a strip at least 16"long.  Cut 8 squares 2"each
Draw a line on the back of each of these squares from corner to corner.
 Place the 2"squares on two opposite corners of the 3 1/2"squres, and sew along the drawn line.
Cut off the excess fabrics.  You can discard, or keep these - you don't need them for this project.

press the corners out, with the seams flat.

Next"choose the fabric for the centre cross.  Cut 2 squares 2"and one strip 5"x 2"
Find some good contrasting fabrics for the ends of the cross.  Cut 4 squares 2"
I made my blocks in this order  -  the corner pieces, then added the little strips between 2 of them, then put the larger strip of the cross through the centre.

When I pressed the blocks, I made sure one of the centre pieces I press out, and the one where I joined the 3 sets, I pressed in.  This is so that when I come to joining all the blocks together, I will be able to butt all the seams together.  If they don't fit one way, then I just turn them, and they will fit the other way.

The finished size of my blocks are 7 1/2".  If you use the pattern on Block Base, you can choose any size you want.  However, you do get a template for the outer corners of the blocks, which might be a bit tricky for some people.

Colour choices.......for me, it was about getting a good contrast, and not really trying to match anything.  People often comment to me that they can pick out my quilts, because of the colours/fabric  mix I use.  It is because I do not "over-think"it, and do not spend too much time choosing what does or does not go with something.

Hope you enjoy making these lovely little blocks as I have.  Good luck with it!

What I forgot to write (as I had the internet cut in and out) is that if you want to use the Block Base pattern it is number 1970 and has a square in the centre, where mine just has the straight strip.

Tuesday, March 1, 2016

I love scrap quilts!


I am just having a good time playing with all my scrappy fabrics, to make these great blocks.  So far, I have managed to make 12 blocks - and only that many because my DH is away.

On Sunday, I decided to cut up heaps of pieces, so that I could just pick them up and sew together.
 I was astounded at how many striped or directional fabrics I had to cut up.  I must admit that I have always favoured them, and buy some whenever I see them.  There is so much you can do with these fabrics.

Some fabrics can be cut so that you can use them in two different ways.  I have done this with a few of the fabrics.


Look at all these gorgeous stripey fabrics I found !  Just love them.

Then I started cutting up 2" strips of dark/medium/light fabrics for the rest of the blocks.  I have used most of these, and cut up a whole lot more today.

These are the blocks I made today
and these I made yesterday.  Once everything is cut up, it takes only 15 minutes to make one block.  I am on a roll.


Saturday, February 27, 2016

Noughts and Crosses - a new scrap project


I started a new scrap quilt this week.  I had been eyeing off this design for some time, and had pinned a modern version of it to my Pinterest board 

I don't do too much with Pinterest, but it is a good source of ideas and inspiration.  It did look a bit complicated/fiddly.  I did some searches on the block, and found it under a number of names, but found that it was in Barbara Brackman's Quilt BlockBase attributed to Nancy Cabot......so it is not a modern block, it is in fact an old one, very suitable for my fabrics.

One of the the things with this block, is the need to use directional fabrics to get the full effect of the "cross"part of the construction.  Ideally, we would like to use fabrics with the stripe printed on the diagonal, then you don't end up with those scary "off grain"corners.  I don't have many diagonal print blocks, so used what I had and cut the others off grain, with the stripes going from corner to corner.  the above block turned out well I think.  I used some precious old pieces of the Reproduction fabrics.  The one in the centre is around 20 years old, and one of the first Repro fabrics I bought.  It is from the Cocheco Mills (*I think!) and I have the tiniest bit left. Love it to bits.
 This is the only fabric I used today, that is printed on the diagonal
 These are all on the cross


 The constructions is far more simple than I first thought.  the pieces go together like this.  Make the corners and the centres, then but them all together.

 this blue fabric is one of my precious scraps.  I used the last of it today

This is the first block I made, and I think the least attractive.  The top LH corner fabric I did not cut so that the stripe runs down the centre, and it just misses something.  Never mind, in the mix of things it will work out.

The blocks took me 30 minutes each to make.  This includes fabric selection, and cutting, and sewing, pressing.  Does not include runing out of thread in the bobbin - don't you hate that!--and taking photos of course.  I usually time how long to make them, and then I can set myself a target for how many I can make a day, and how many days/weeks/months it will take to make it.

If I am making something for a magazine, they usually give me a deadline, and i always make the deadline if I know how long each one takes.

I put these 4 blocks together and you can see that you get an interesting secondary pattern.  I think I am going to like this!

The blocks are 7.5"finished, and if I want a quilt 60"x 75"then I will need 80 blocks, at 4 a day then that is 3 weeks....that is if nothing else happens in my life in the next 3 weeks.......I will probably give myself a longer goal, maybe 3 months!

Now for something different.  Right now is Festival time in Adelaide, and in particular the Fringe Festival.  Last night I took my granddaughter to a light display in the city.  The old public buildings on North Tce  -  the museum, art gallery, library, and university have these light shows happening.  They are like a moving picture show from the turn of the century.  You can only really appreciate it in the moving form.  These photos do not give it justice.


It finished on Sunday night 28th February, so if you have not been yet, it is worth the visit.  Breathtaking!


Saturday, February 20, 2016

New Block

This is the next block in the Red and Green block of the month.  It is called Lollypop......for obvious reasons I think.

It is not the first time I have used this block.  Quite a few years ago I used it in a 4 block quilt called Fruit Tingle.  The blocks in this quilt were 16".
Fruit Tingle
I used this quilt as a teaching project for a few years.  It was a good one to teach needle-turn applique.  The blocks, and therefore the shapes, are quite large, so new people can tackle the larger pieces, and get the general idea, before moving onto the more tricky shapes.

This Lollypop block is 8"finished, but you can increase the size when you print it, or photocopy it by increasing the ratio.  It is available now, and will be free of charge for one month.  If you look on the RHS of this page, you will see the photo and link.  Just click on the photo, and you *should* be able to print out the drawing.  If you have a problem, just email me.

I have had a really busy month with visits from my sister who lives in Newcastle, in NSW, plus my daughter is moving house next week.  The lead into the move has been really all consuming.  However, we did get a lunch day out when my sister was here.
Maz, Wendy, Di

We went to a fabulous place called the Bombay Bicycle Club.  this is an old pub, which has been converted into an Indian/English Raj themed venue.  If you click onto the link, you can see all the great images of the interior.  It is quite breathtaking.  They have palm trees growing in the dining room.

Natalie, Skylar, and Di at Glenelg
 Glenelg is one of our beach side suburbs, and we had a day out in the sun
Wendy and Di - Very bad selfie at Brighton
 
Edit.......
 I was asked about fabrics needed for the Red and Green quilt.     There are 12 blocks each needs to be cut 9"square....so you can cut 4 across the width of fabric, 1 metre/yard would be enough for the background. The rest is scrappy.....just use what you have.