Welcome! This is the blog of Wendy Whellum and Legend and Lace Designs

Welcome to the Blog of Wendy Whellum and Legend and Lace

To find out more about Legend and Lace please visit the website http://www.legendandlace.com/


Quilt Gallery

Showing posts with label scrap quilts. Show all posts

Tuesday, October 4, 2016

Long time - No see!

Did you look at the date of the last post? 1st August!  I can not believe that I have been absent for 2 months.  Mind you, it has been a hectic 2 months in one way or another.  There is a lot of catch up to do

In July, my friend Penny, opened her new shop at Victor Harbor, PennyLane Patchwork.  The opening was on the windiest coldest day this winter.  We all snuggled inside, and greeted the customers.  The photo above is the new Block of the Month I have started to make for the shop.  It is in Jen Kingwell "Lollies"fabric, and will be ready next year.  All the blocks are circles of one kind or another.  Some simple, some more complicated.


 Then in August, I went across to Melbourne, and stayed with my friend Janet O, and was the guest speaker at the Victorian Quilters Annual General meeting.  That was a bit of a treat for me, and I hope they enjoyed the quilt show and tell I had for them.  While in Melbourne, I visited the National Gallery of Victoria, to see the Making the Australian Quilt Exhibition.  A few of the quilts are shown above, but I think there are restrictions on showing them, so I had better be good :-) You can read about it on the link.  It is a must see exhibition if you are in Melbourne until 6th November.

 So, we get to September, and we have SPRING!!  Yay!!  we had the wettest spring on record, with gale force winds, and floods across the state.  It is still raining now, but we have been promised sunshine by the end of the week.

In preparation for Spring, I started to make these sunshiny blocks.  They are made from a Layer Cake, but I added a few other fabrics that I had picked up along the way.  The blocks are "Dresden Squared".  I am making about 20 of these, or more, as I think they would make a great workshop idea.  Simple cutting and sewing.  The trickiest part is appliqueing the centre circles.  This I am doing on the machine as well.


I got the Noughts and Crosses quilt finished.  I posted about the start of it back here .  It is all done, and hanging on the clothes line (along with the washing!) so I can take a photo.  I had it machine quilted with an all over Clamshell design, by Helen Campbell at the Quilting Room.

Also, forgot to mention, that during all this time, I had taken on a part time job!  It is finished now.....what was I thinking of???

Another one on the clothes line.  This one is our Spring into Summer workshop for 11th November.  It is a Jelly Roll quilt, or in my case, 2 1/2"strips from my stash.  I used only brown and brown prints, plus the solid blue, and I just love it!  It makes the brown look like gold.  It has gone off to be quilted as well.  There are spaces on the workshop if you are interested.  Email me for details.

 Last weekend we had the South Australian Quilters annual Festival of Quilts. I had a shop stand there, and can you believe, I did not take one single quilt photo!!  I was far too busy serving customers.  thanks to everyone who called by to buy some of my goodies, or just have a chat.  We will be back next year.

You know what happens at a quilt show, you get inspired to do new things.  Like I have not got enough UFO's to keep me busy for a while.......but I have had an Arabic Lattice quilt idea in my brain for a while.  This is a simple and tricky block, and it has danced with me for about 15 years.  Now it is about to get done.  I drew it up on EQ and this is the result.
 It starts with a 4 patch centre, and then you wrap triangles around that.  You can only partially sew the first triangle in place as show about.

 Then you can add the second triangle
 add the third triangle
 you are left with the first triangle, still flapping about
and finally you can sew that in place.  

I have made 3 of these this morning, and cut out a further 3.  The placement of the colours, will give you a number of different designs.  Wait a while and I will show you what they all look like sewn together.  I have made them 9" so I am thinking 20 blocks, plus a border, will give me a good size quilt.

Thanks for taking the time to read all my catch up news.  Sorry to have neglected all this time.

Monday, March 21, 2016

What have I been doing this week?

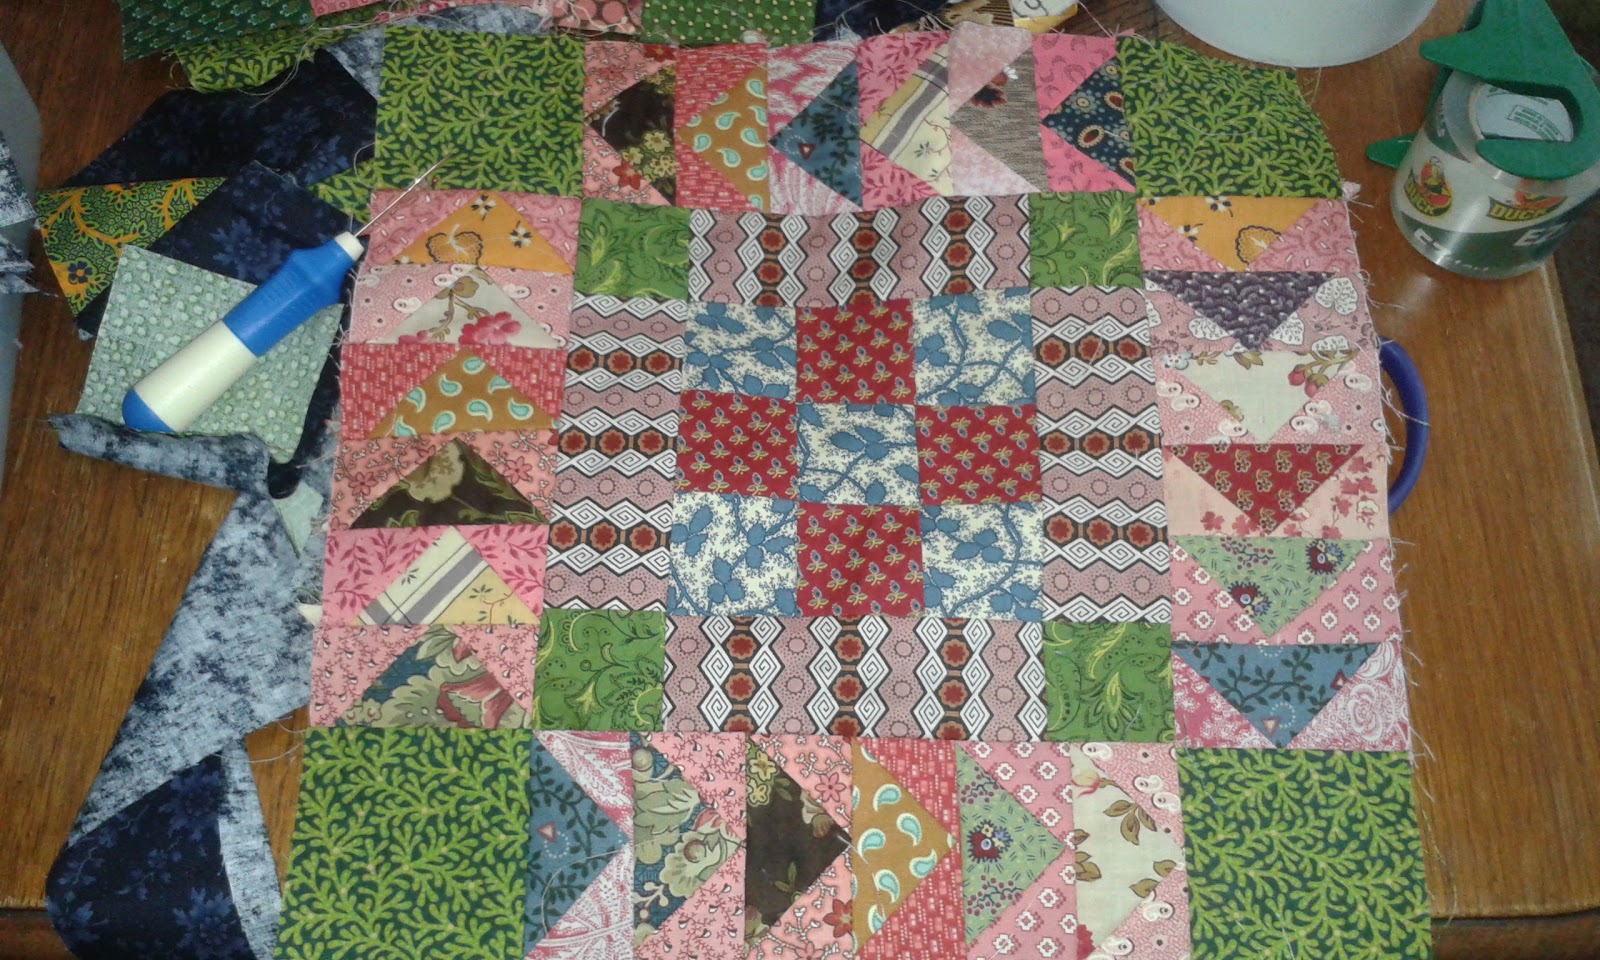
 I decided to finish my UFO "Hawaii Sunset".  Having decided not too many shortcut would do, I started to tackle the side half blocks.  I cut up and sewed the pinks and greens
 Adding the bright blue strips first
 then the dark blue strips
Finally, I got the 4 corner pieces done. These strips, squares and triangles are not the same size as those above, but they look like they are.

I had thought it would take me a day.....wrong!  Once cut, it took me about an hour to make them all,
Time to start the assembly, starting with the corners and working towards the centre.  This is where I came unstuck!
 These blocks are wrong.  The Flying Geese are flying in all sorts of directions

These FG are correct.  They start at the bottom, fly around the centre, upwards towards the top, where the points meet.  Almost half of my blocks were wrong!.


This may have been the reason they ended up in the "too hard"box 6 years ago.  Who does not hate unpicking?

Two hours back on this project, and I had the job of unpickin 2 FG strips on almost half of the blocks.  It took me half a day, but I did it.

Row number two added

Row number 3 added


Row number 4 added, and I am running out of space on my floor to take photos.


Finally, all the blocks are assembled, with the sashing.  Time to get those 4 patch blocks out and see what I can do with the borders.


I had to lay them down on the the passage floor to get a shot.  However, I did measure them against the quilt and, low and behold, they fit!  Even the the top and bottom borders fit......and that was pure luck.  I had turned this into a rectangle quilt rather than a square quilt, and had no idea if the top and bottom borders would be ok...half a 4 patch too short or too long?.....no .....they fit!  I had visions of having to slip in a skinny strip of fabric along the edges to make it all fit, but looks like it is not necessary.

This past week I have done very little else about the house, but it seems to be worth it to get this old beauty finished.

How am I going to quilt it?????  I am not skilled enough to machine quilt it myself, and hand quilting is my preference, but there are so many seams, I think it is going to be hard going.  Custom machine quilting I think might be the answer, and I will investigate the options there.  Any ideas?


Wednesday, March 16, 2016

One UFO that will get finished

When I was having de-clutter a few weeks ago, and I was looking for odd blocks to turn into "something",  I found a box of treasures.
I decided they were too good to go into the "odd block"quilt and put them back on the shelf "for another day (year?)".  This quilt was started in March 2010.  How do I know that?  I blogged about it HERE .

The blocks were completed in August of that year.  I have the photographic evidence! Right here

So what went wrong?  The darn edge pieces and the sashing!  It is fun making the blocks, then you have to make it into a quilt!

On the weekend I went to the hospital to visit my friend Sheila.  She has been in and out of hospital for the last month, and pretty well sick of the whole thing. She asked me to bring along some "show and tell".  I dug out the blocks I have been working on for the last few weeks.

Plus the quilt blocks I found while cleaning out.  There I was, supposing to cheer up a sick friend (and by all accounts it did), and she was the one who inspired me into getting this thing finished.

I counted up and had 18 blocks.  I can recall that I had decided not to do a square quilt, but a rectangular one instead.  Also, I recall thinking I would do a straight set and not a on-point set......but I had 18 bloocks, which is what I needed to do the on-point.  It was those tricky side half block pieces that must have made them all go into the "too hard box" and stay there for 6 years.

I also found that I had made heaps of the 4 patch border pieces.  I can't not do it!

After my visit to hospital, I got home and started cutting up the sashing (yes I had that too!) and the setting squares.  I had more or less decided to use a pretty print on the sides instead of the pieced units, but could not decide on the print.

So, it did worked.  the visit to hospital cheered me up no end!  (sorry Sheila)

Today I made the first of the side triangles.  And, they are not as bad as I thought.  I made one, and it took me 5 minutes to cut and 5 minutes to sew.  So, once I get them quick cut, and feed them through the sewing machine, I recon I will have them done in a day.


This is how they go with the blocks and sashing.  I am really going to give myself a target with this one, and see if I can get it done this year  -  hand quilted and all!

Thursday, March 3, 2016

By popular demand.....

I have had quite a few people ask me how to make this little Noughts and Crosses (my name for it) block.  So I will show you how it is done.

4 squares 3 1/2"each
Choose 4 different fabrics for the corners.  I used directional fabrics, and cut on the cross.  The squares measure 3 1/2".  I made myself up a little plastic template so it was easier to place along the line of the print.

8 squares 2"
 Next choose a fabric that will go with the above fabric as a contrast.  I cut up lots of 2"strips in various colour values, and just chose from that.  You will need a strip at least 16"long.  Cut 8 squares 2"each
Draw a line on the back of each of these squares from corner to corner.
 Place the 2"squares on two opposite corners of the 3 1/2"squres, and sew along the drawn line.
Cut off the excess fabrics.  You can discard, or keep these - you don't need them for this project.

press the corners out, with the seams flat.

Next"choose the fabric for the centre cross.  Cut 2 squares 2"and one strip 5"x 2"
Find some good contrasting fabrics for the ends of the cross.  Cut 4 squares 2"
I made my blocks in this order  -  the corner pieces, then added the little strips between 2 of them, then put the larger strip of the cross through the centre.

When I pressed the blocks, I made sure one of the centre pieces I press out, and the one where I joined the 3 sets, I pressed in.  This is so that when I come to joining all the blocks together, I will be able to butt all the seams together.  If they don't fit one way, then I just turn them, and they will fit the other way.

The finished size of my blocks are 7 1/2".  If you use the pattern on Block Base, you can choose any size you want.  However, you do get a template for the outer corners of the blocks, which might be a bit tricky for some people.

Colour choices.......for me, it was about getting a good contrast, and not really trying to match anything.  People often comment to me that they can pick out my quilts, because of the colours/fabric  mix I use.  It is because I do not "over-think"it, and do not spend too much time choosing what does or does not go with something.

Hope you enjoy making these lovely little blocks as I have.  Good luck with it!

What I forgot to write (as I had the internet cut in and out) is that if you want to use the Block Base pattern it is number 1970 and has a square in the centre, where mine just has the straight strip.

Tuesday, March 1, 2016

I love scrap quilts!


I am just having a good time playing with all my scrappy fabrics, to make these great blocks.  So far, I have managed to make 12 blocks - and only that many because my DH is away.

On Sunday, I decided to cut up heaps of pieces, so that I could just pick them up and sew together.
 I was astounded at how many striped or directional fabrics I had to cut up.  I must admit that I have always favoured them, and buy some whenever I see them.  There is so much you can do with these fabrics.

Some fabrics can be cut so that you can use them in two different ways.  I have done this with a few of the fabrics.


Look at all these gorgeous stripey fabrics I found !  Just love them.

Then I started cutting up 2" strips of dark/medium/light fabrics for the rest of the blocks.  I have used most of these, and cut up a whole lot more today.

These are the blocks I made today
and these I made yesterday.  Once everything is cut up, it takes only 15 minutes to make one block.  I am on a roll.